LNMP架构基本概述
什么是LNMP
lnmp是一套技术的组合,L=linux、N=nginx、M=[mysql|mariadb]、P=[php|python]nginx仅支持解析html文件,图片传输,视频传输,不支持php脚本文件
LNMP实现过程
- 用户请求
http://xxx.net/index.php,对于nginx服务而言,是无法理解index.php这样的脚本,那么nginx该如何配置,才能支持这样的动态请求呢?- 第一步:当用户发起
http请求,请求首先被nginx接收 - 第二步:
nginx通过预先定义好的location规则进行匹配 - 第三步:
nginx将匹配到的动态内容,通过fastcgi协议传到给后端的php应用服务处理
- 第一步:当用户发起

LNMP实现细节
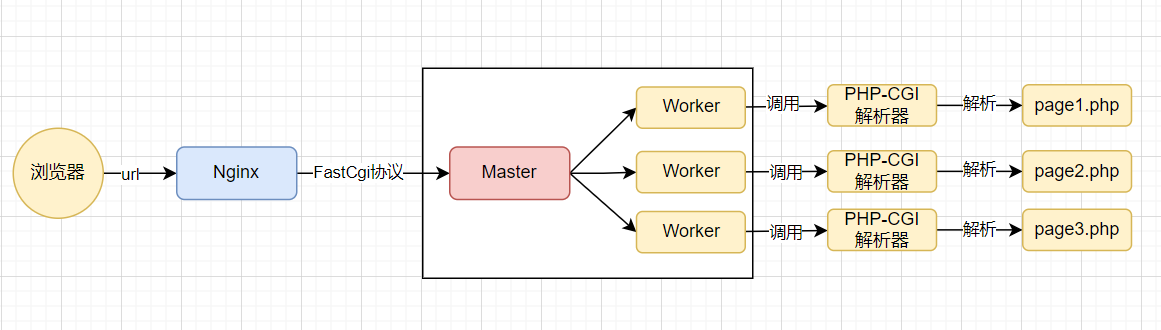
nginx、php、mysql之间是如何工作的
- 用户首先通过
http协议发起请求,请求会先抵达nginx nginx根据用户的请求进行location规则匹配location如果匹配到请求是静态,则由nginx读取本地直接返回location如果匹配到请求是动态,则由nginx将请求转发给fastcgi协议fastcgi收到后会将请求交给php-fpm管理进程php-fpm管理进程接收到后会调用具体的worker工作进程worker进程会调用php解析器解析代码,php解析后直接返回- 如果有查询数据库操作,则由
php连接数据库(用户 密码 ip)发起查询操作 - 最终数据由
mysql->php->php_fpm->fastcgi->nginx->http->user
LNMP架构环境安装
Nginx安装
- 使用官方仓库安装
nginx
cat /etc/yum.repos.d/nginx.repo
[nginx-stable]
name=nginx stable repo
baseurl=http://nginx.org/packages/centos/$releasever/$basearch/
gpgcheck=1
enabled=1
gpgkey=https://nginx.org/keys/nginx_signing.key
module_hotfixes=true
# 安装nginx
yum install nginx- 配置
nginx进程运行用户
groupadd -g666 www
useradd -u666 -g666 www
sed -i '/^user/c user www;' /etc/nginx/nginx.conf- 启动
Nginx,并将Nginx加入开机自启
systemctl start nginx
systemctl enable nginx
PHP安装
- 安装
repo文件
yum install epel-releaserpm http://rpms.famillecollet.com/enterprise/remi-release-7.rpm
- 安装高版本的
php
yum -y install php74-php-devel php74-php.x86_64 php74-php-cli.x86_64 php74-php-common.x86_64 php74-php-gd.x86_64 php74-php-ldap.x86_64 php74-php-mbstring.x86_64 php74-php-mcrypt.x86_64 php74-php-pdo.x86_64 php74-php-mysqlnd php74-php-fpm php74-php-opcache php74-php-pecl-redis php74-php-pecl-mongodb php74-php.xml.x86_64
- 配置
php-fpm用户与nginx的运行用户保存一致
sed -i '/^user/c user = www' /etc/opt/remi/php74/php-fpm.d/www.conf
sed -i '/^group/c group = www' /etc/opt/remi/php74/php-fpm.d/www.conf- 启动
php-fpm并将其加入开机自启
systemctl start php74-php-fpm
systemctl enable php74-php-fpm
MySql安装
- 安装
mariadb数据库
yum install mariadb-server mariadb
- 启动
mariadb数据库,并加入开机启动
systemctl start mariadb
systemctl enable mariadb- 给
mariadb配置登录密码,并使用新密码进行登录数据库
mysqladmin password 'xxx'
mysql -uroot -pxxx
LNMP架构环境配置
- 在配置
nginx与php集成之前,我们需要先了解nginx的fastcgi代理配置语法
Fastcgi代理语法
- 设置
fastcgi服务器的地址,该地址可以指定为域名或ip地址,以及端口
syntax:fastcgi_pass address;
default:-
context:location,if in location
# 语法示例
fastcgi_pass localhost:9000;- 设置
fastcgi默认的首页文件,需要结合fastcgi_param一起设置
syntax:fastcgi_index name;
default:-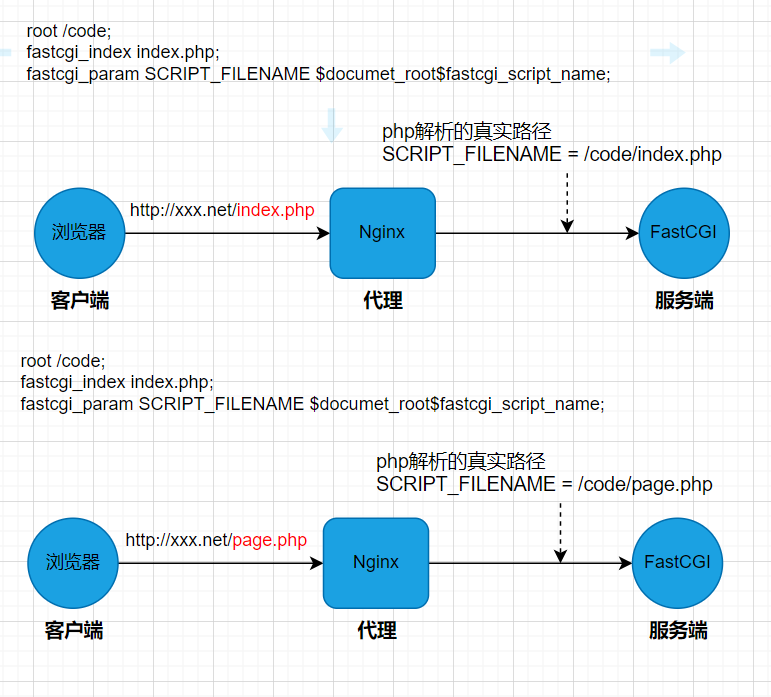
context:http,server,location- 通过
fastcgi_param设置变量,并将设置的变量传递到后端的fastcgi服务
syntax:fastcgi_param parameter value [if_not_empty];
default:-
context:http,server,location
# 语法示例
fastcgi_index index.php;
fastcgi_param SCRIPT_FILENAME $document_root$fastcgi_script_nmae;- 通过图形方式展示
fastcgi_index与fastcgi_param作用
Nginx与PHP集成
- 编写
nginx配置文件
cat /etc/nginx/conf.d/wordpress.conf
server  {
         listen 80;
         charset utf-8;
         client_max_body_size 100m;
         root /website/wordpress;
         location / {
              index index.php;
         }
         location /download {
              root /;
              index index.html;
              autoindex on;
              autoindex_localtime on;
              autoindex_exact_size off;
         }
         location ~ \.php$ {
              fastcgi_pass 127.0.0.1:9000;
              fastcgi_param SCRIPT_FILENAME $document_root$fastcgi_script_name;
              include fastcgi_params;
         }
}- 在
/website/wordpress目录下创建info.php文件
cat /website/wordpress/info.php
<?php
        phpinfo();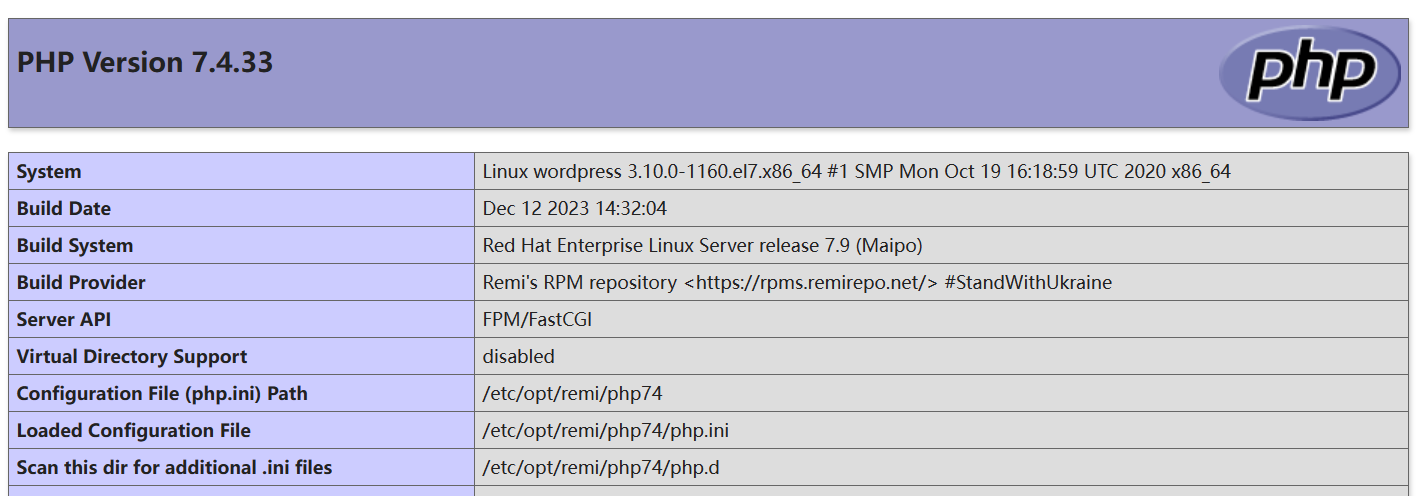
?>- 通过浏览器访问
/info.php,返回如下页面表示nginx与php配置成功
PHP与MySql集成
- 在
/website/wordpress目录下创建mysqli.php文件,填入独赢的数据库IP、用户名、密码
<?php
    $servername = "localhost";
    $username = "root";
    $password = "xxx";
    // 创建连接
    $conn = mysqli_connect($severname,$username,$password);
    // 检测连接
    if(!$conn) {
        die("Connection Failed:" . mysqli_connect_error());
    }
    echo "php连接MySql数据成功";
?>- 使用
php命令直接解析文件
php74 /website/wordpress/mysqli.php
- 也可以通过浏览器访问
/mysqli.php文件,获取解析结果
部署开源产品
部署博客Wordpress
配置Nginx
- 配置
nginx虚拟主机站点
cat /etc/nginx/conf.d/wordpress.conf
server  {
         listen 80;
         charset utf-8;
         client_max_body_size 100m;
         root /website/wordpress;
         location / {
              index index.php;
         }
         location ~ \.php$ {
              fastcgi_pass 127.0.0.1:9000;
              fastcgi_param SCRIPT_FILENAME $document_root$fastcgi_script_name;
              include fastcgi_params;
         }
}- 检测语法,并重启
nginx服务
nginx -t
systemctl restart nginx
配置MySql
由于wordpress产品需要依赖数据库,所以需要手动建立数据库
mysql -uroot -pxxx
mysql> create database wordpress;
mysql> exit;
部署Wordpress
- 获取
wordpress产品,解压并部署wordpress
cd /website
wget https://cn.wordpress.org/latest-zh_CN.tar.gz
tar xf latest-zh_CN.tar.gz - 授权权限为进程运行的用户身份
chown -R www.www /website/wordpress/
-
主题下载Mynote,插件下载WP Githuber MD
-
更改主题字体为雅黑,Mynote主题自定义,额外CSS配置如下:
*:not([class*="icon"]):not(i) {
    font-family: Segoe UI, "Microsoft Yahei" !important;
}- 增量同步媒体库文件(推)
rsync -avz /website/wordpress/wp-content/uploads/ root@139.199.79.133:/website/wordpress/wp-content/
- 同步腾讯云phpmyadmin(拉)
rsync -avz root@139.199.79.133:/website/wordpress/phpmyadmin /website/wordpress/
chmod -R 777/var/opt/remi/php74/lib/php/-
用phpmyadmin从本地数据库导出wp_posts表到腾讯云的数据库;wp_posts表的post_content、guid使用搜索-->查找替换功能,把blue.yn.cn替换为139.199.79.133
-
设置好域名,设置-->常规
WordPress 地址(URL) http://blue.yn.cn
- phpmyadmin导入2M限制修改
vim /etc/opt/remi/php74/php.ini
upload_max_filesize = 100M
memory_limit = 512M
post_max_size = 100M
systemctl reload php74-php-fpm.service
留言